Tuesday, April 26, 2011

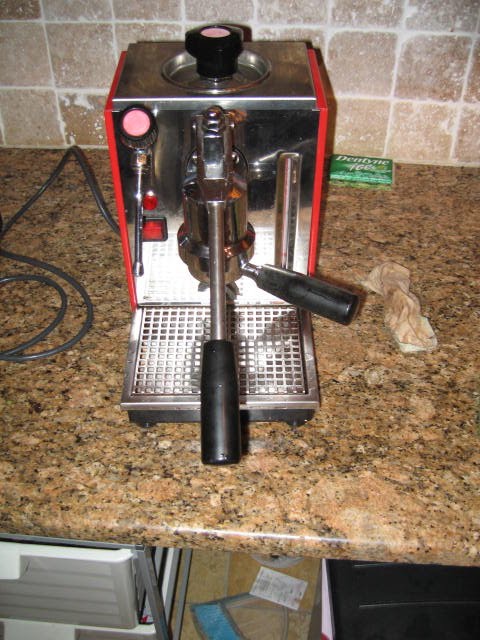
1990 Olympia Cremina for sale


time to make some room and sell my beloved 1990 Olympia Cremina. I have treated this machine very well, and it has provided me with great espresso. It operates with out a flaw and is fully functional. the body is without dents and shows minimal wear for its age. When I got it, the bottom place was rusted. I removed the rust and painted it with a rust inhibiting paint. The repair can be seen in the last photo


Here are pics to the repair of the bottom plate

Sunday, March 14, 2010

piston back together.

Because the piston comes apart, the gaskets are extremely easy to install. But because the gaskets were so hard, I was not able to get the assembled piston back in the group head. I had to take the piston and gasket apart, put the parts inside the group head, and reassemble it inside the grouphead.

gaskets compared


Here are the gaskets of the Cremina 2002 compared to the Cremina 67. On the top left is the 2002 grouphead gasket. Below it is the 67 grouphead gasket. The two are interchangeable and identical. In the center is a 67 piston gasket stacked on top of a 2002 piston gasket. To the right is a 2002 piston gasket above a 67 piston gasket.Here is a close up of the gaskets stacked on each other. They are very close in diameter, but the 2002 gasket has a slightly larger diameter.

clean parts

c

Here are the parts of the piston after cleaning, along with a portafilter.


Here is a pic of the new gaskets. They are extremely hard and seem to be very well made.

Here is a pic of the piston shaft. When I pulled it from the machine I noticed that it had deposits on it and was not smooth. It is my guess that the gasket at the top of the group head was not able to form a good seal because of the depostis and that is why I was getting a small leak. I scrubbed it the best that I could to bring it back to a smooth condition. Hopefully this will stop the leak.

Olympia Cremina 2002 has arrived!


I recently got my hands on a used Cremina 2002. It was in very good condition, but had been sitting in storage for the past four years. When I went to use it for the firtst time, a small leak developed where the top of the piston shaft exits the group head. No big deal, this is my fourth Cremina (first 2002 though), so I dont mind replacing the gaskets.
I contacted the U.S. Cremina distributor to get a new gasket set, and was notified that Olympia was no longer making the new style gaskets, and that all of the new machines would need to be retorfited with the older style gaskets (Cremina 67 gaskets). This process requires the installation of a new piston and the group head will need to be machined. The distributor has the tools to machine the group head on order, and as soon as it is in I will send the group head off to have the process done. Until then, I decided to remove the piston and give it a cleaning and lube.


Here is a pic of the gaskets of the piston. The one with the red band is for the lower groove on the piston and the one with the metal spring in it is for the upper.

Tuesday, April 28, 2009

Side By Side


Here is a shot of my red 1990 Oly and the Brown 1987 Oly side by side. I wish I could keep them both. I will pull another shot on it tomorrow, and then give it a nice polish and cleaning, getting it ready for the new owner.

Frothing Milk

Not the prettiest Cappucino ever, but man does it taste good!
This machine steams milk with a lot of power. I used Gaggias before I got my first Cremina, and I was shocked at how much easier it is to steam/foam milk when you have as much steam power as the Cremina
Ready to foam milk for the cap!

FIRST SHOT!!!!


I pulled this shot while trying to take the picture. Not the best shot I ever pulled, but not too bad
tamping the grinds
Warming the cup
Alright, here goes the first shot

Pstat set

The Pstat is now set to .9bars and ready to make espresso. I will let the machine cool, then refill and pull a shot.

Pressure test


Olys use a pressurestat to regulate temperature. The range that an Oly should work within is 0.7 to 0.9 bars. I prefer my machines to hit at .9bars and this one is about at .7. I will adjust the P-stat to .9bars before I pull the first shot.

Warming machine up for first shot

Another reason to use a later machine is that they started putting these 'cuts' in the treads ontop of the boiler. This cut is a saftey feature that give you a loud warning if you try to open the boiler cap while the machine is too hot. Older machines will not give you this warning, and spew hot water everywhere when the cap is removed.
filling up the boiler using a silicon funnel
sight glass in action
warming up.

flushing the boiler

At this point I am give the whole system a complete flush by heating it up and running water through it to make sure that any impurities from the rebuild process are completely removed. At the same time I am cleaning the portafilter and basket in the discarded water. I will pull a shot later today.
Group in action
Yes, this is a pic of the steam valve open. You are not seeing steam becasue the steam is very dry. Perfect for making a nice cappuccino.

Monday, April 27, 2009

more pics of assembled Oly


condition of case

Back
Left side
right side
Interior

Top
marks on corner
Other corner is clean.

So here are pics of the case. As you can see the paint is in amazing condition and has great depth and shine. There are a few nicks to the paint, but nothing major. Overall very acceptable.